    interface


 How to:

      select

       color

   use layers

     add text

    anim gifs

        work


 Download:

       GIMP

        GTK

     the tutor


 'office'
 [email protected]
I know it sounds corny, but, just like in nature, selection plays an important role in GIMP in general, and skinning in particular. You can choose the selection tools from two places: -the toolbox:- the 'Tools' menu:
Now I won't stress too much all the tools you can use to select; I mean come on, you know how the 'Rectangular select' works, or the 'Free select' tool. However, I will talk about the 'Smart scissors', the 'Fuzzy select' and the 'Color select'. Ok, first, the 'Smart Scissors'. This tool helps you select parts of an image, guiding itself after the contour. The selection will 'snap' to the edge of an object:
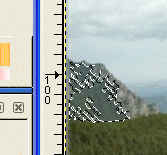
As for the 'Fuzzy select', you'll notice that this tool selects continuous zones that have pretty much the same color.
Watch carefully the folowing images:
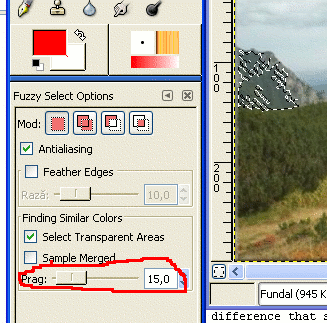
'Prag' stands for 'Threshold' in Romanian. As you can see, if you increase the threshold, you'll have larger selections. That easy. The 'Color select' tool works almost the same way, except the fact that you woun't get continuous zones selected. Instead, you'll get several zones. I won't put a picture for this one because it's pretty easy to use it. Now this pretty much covers the tools themselvs. It's time to talk about some real selection operations. a. Adding to a selection So you've selected a portion of the image, but you want to select other areas too, since you'll want to alter them the same way. What you need to do is pick a selection tool and, KEEPING THE SHIFT KEY PRESSED, select that other area. While keeping SHIFT pressed, you'll notice that the cursor has a '+' sign next to it. That means that you'll be adding your selected area to the current selection. b. Subtracting from a selection Basically, you've selected a little bit too much and now you want to get rid off some parts. Well, choose the selection tool best fitted, and, KEEPING THE CTRL KEY PRESSED, select the area you want to discard from your current selection. While keeping CTRL pressed, you'll notice that the cursor has a '-' sign next to it. That means that you'll be subtracting your selected area from the current selection. c. Intersecting selections Well, this type of situation doesn't appear that often like the two mentioned before. However, if by any chance you need to select an area that already is in a selection, KEEP BOTH THE CTRL AND SHIFT KEY PRESSED while selecting that area. This way, you'll select areas that were part both from the current selection and the one you've just made. Again, the cursor changes. It'll have an 'U' turned upside down, the mathematical sign for intersection. Shortcuts: - CTRL-A : select all - CTRL-SHIFT-A : deselect all - F : free select - Z : fuzzy select - E : eliptical select - I : inteligent scissors Since I'm out of ideas regarding selection, I think I'll stop here for now.