 Vis zoning:

        BSP

   hullmakers

      portals

       demo


     brushes

      nosnap

 'office'
 [email protected]
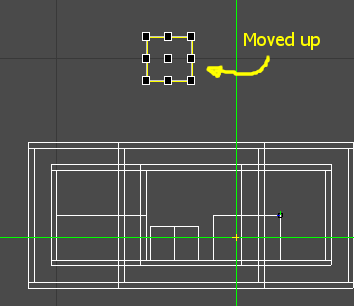
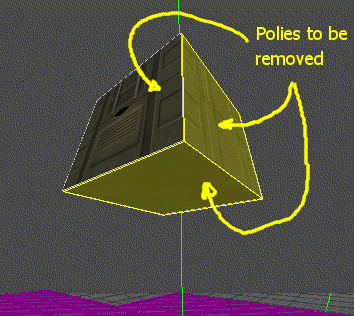
Well, nosnapnocsg is one (very) nice way to make maps. The basics of nosnap consists in manually removing all the unseen polies from a map. This way, the processor has little job to do. Maps process faster and, usually, also run faster. The only two drawbacks to this method are: 1. it requires a little bit of experience 2. it's time consuming This small tutor tries to eliminate the first one. The second one can be dimmed only after getting used to this method. All nosnap maps use single-sided geometry. One cubic brush is made from 6 single-sided square brushes. They are aligned with their faces (normal vectors) outwards. Now, if that brush were to be placed on a floor, the face placed on the floor will never get seen by the player. So, why not remove it? That is the essence of nosnap: removing all the polies that the player won't get to see. The map will run better and process faster. Normaly the processor does that for the Detail 0 brushes, but with a lot of time consumed. The processor however won't do jack shit for your Detail 1 brushes and prefabs. This poly removal can be applied to any kind of brush: hull or prefab, detail 0 or detail 1. It works perfectly. Now this nosnap thingie can be tricky when working the hull (outer detail 0 geometry) to nosnap; if you remove the wrong poligon, you'll get a leak. Ok, now how do you remove the face of a cube? Well, first, you must un-join the faces of that cube. Simply select the cube by clicking on it, then hit CTRL-J. This way, you actually unjoin all the faces of the brush. Now delete the face that was pointing downwards. You should obtain something looking like this:One hint: before un-joining the brush, move it somewhere you won't be bothered by other brushes. Usually, I move it upwards 2048 DEdit units. Then do the un-joining and deleting part:


Then I selected the polies that I wanted to remove. One simple click usually does the trick:

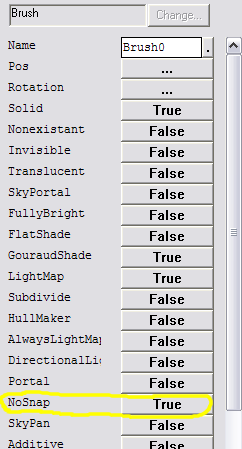
All the remaining faces (now single-sided geometry) must have the NOSNAP flag set to TRUE:
Plus, you must process your map with the extra parameter -nosnapnocsg:
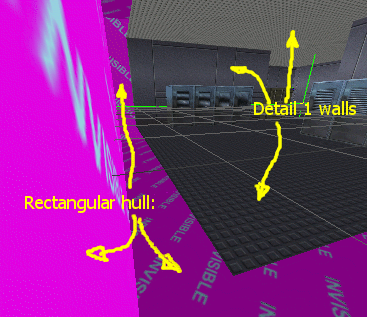
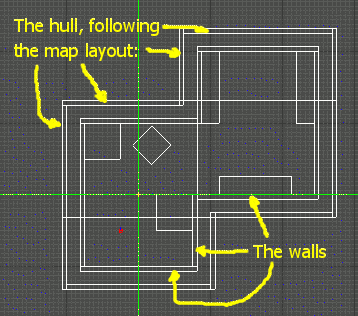
Otherwise you'll get a processing error like 'Invalid brush found at ...' After unjoining, deleting and setting the NOSNAP flag to true, you have two options: 1. rejoin the remaining faces (select all the polies and hit J) 2. leave them unjoined but group the together in s folder (select all the polies and hit CTRL-ALT-G) Now this marks the separation point for two methods of work: 1. My way: First one rejoines the polies and sets them to Detail 1, no matter if they were polies from the walls (that should make the hull) or prefabs (that were supposed to stay Detail 1). Now this will definately leave your level leaking. All you have to do is make a sipmle hull (rectangular section) that follows the main layout of the level:


This asks for the additional effort to create an extra hull, that follows the layout of the map. However, the simplicity of the hull (it has a simple rectangular section for crying out loud!) should make this easier. The time taken for a full optimization is very short (my 12,000 polies SP project takes few seconds through the Full Optimization stage from it's 5 min. of total processing time). 2. Windebieste's way: From what I've seen from the 'posee' project, Windebieste works in a different way: he only rejoines the prefabs and sets them to Detail 1. The polies that make the outer walls will remain Detail 0 and UNJOINED, eventually grouped together into a folder. This way, those polies will actually create the outer hull:
It spares you the effort to manually create the hull. However, it takes a little bit more time to process; the 'Full Optimization' stage takes almost a minute for the 'posee' project (8000+ polies). Remember, iy you use this method you must leave the Detail 0 polies unjoined! Join them and you'll leak. Now the worst thing you can do is compare the two nosnap methods. They give pretty much the same result in pretty much the same time. However, the superiority of the nosnap method against solid-brush (classic) way of mapping was prooved when working at the 'posee' project: the map couldn't be procesed (Full Optimization) while having those huge sections build in the classic way. However, after Windebieste turned'em to nosnap, the map processed in arround 5 minutes, Full Optimization. The .zip file contains three .ed files and this page. First .ed is a room build with solid brushes, the second is a nosnap version of the room using the first nosnap method, while the third .ed file has the same room made nosnap using the second method. My advice is to try to turn the solid-brush room to nosnap yourselves. Just for practice. Expect some errors (most likely you'll forget something in your first attempts). What I expect of you however, is to overcome the errors encountered and aquire one of the two methods of nosnap work. Another nosnap tutorial can be found on modmaker's page. Best of luck and I hope you'll get hooked on nosnap.
